This is the general frequently asked questions page. You can go through all the frequently asked questions for more information. Read More
How can I Install the WP Cookie Consent Plugin? #
- Download the zip file from API Downloads by logging into your WPeka MY ACCOUNTS page.
- Log in as the WordPress Admin of your website.
- Navigate to Plugins > Add New to upload the plugin.
- Click on Upload Plugin and choose the plugin file to upload.
- Click on Install Now and then Activate the plugin.
WP Cookie Consent Pro Plugin is Installed But Unable to Use? #
For WP Cookie Consent Pro plugin, you need to install and activate the required free plugin – WP Cookie Consent (from wordpress.org).
Upon installing and activating the WP Cookie Consent Pro plugin, you will receive a message on the Plugins page, as shown below.

Please install the required plugin to use WP Cookie Consent Pro via the sidebar menu.
How to Receive Plugin Updates From WPeka? #
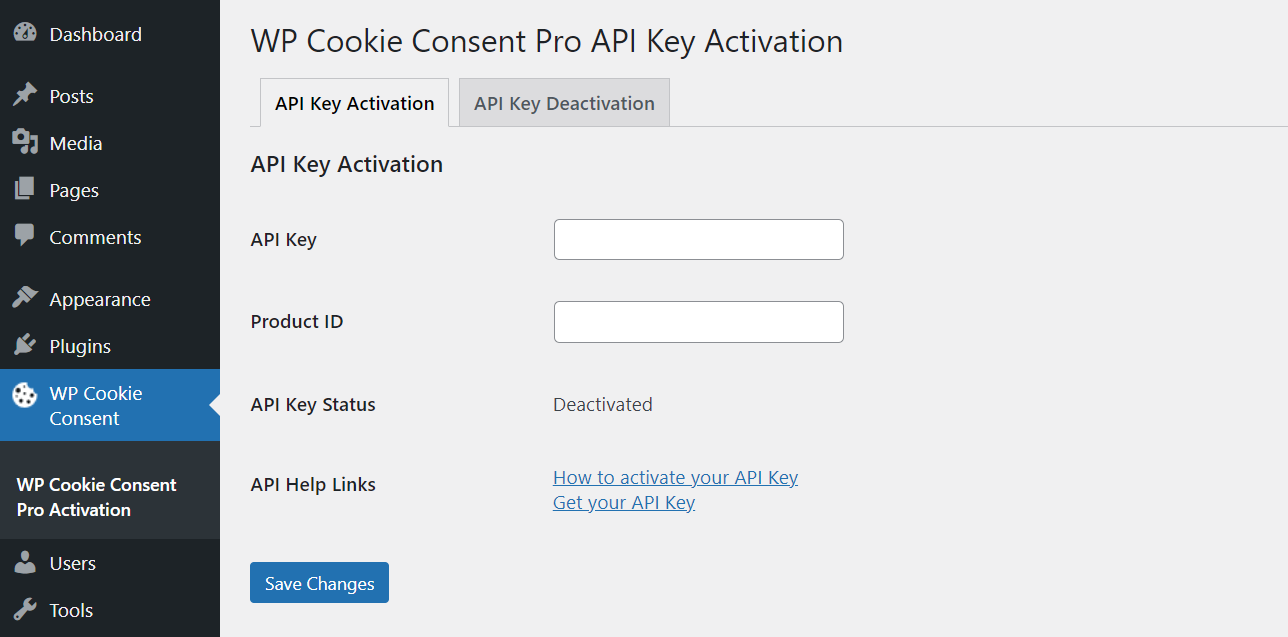
After purchasing the WP Cookie Consent Pro plugin from the WPeka website, you will be provided with a Master API Key and product ID. These are required to use the PRO plugin.
Go to My Account > API Keys section to get your Master API key and Product ID.

WP Cookie Consent Pro requires free WP Cookie Consent plugin installed and activated from wordpress.org
Once the WP Cookie Consent Pro plugin is activated, you’ll see this banner. Click on Click here link, it will take you to the plugin activation page.

Provide API Key & Product ID and click on Save Changes. After that you will see your API key status is activated and you can use the WP Cookie Consent Pro plugin.
How to Generate a Cookie Notice? #
To generate a cookie notice, you need to have the WP Cookie Consent Plugin activated on your website.
To display the cookie notice on your website –
- Go to WordPress Dashboard > WP Cookie Consent > Cookie Settings > Compliances Tab > Cookie Notice Card.
- Enable the Cookie Notice.
- Select the Type of Law you want to generate a cookie notice for – ePrivacy, GDPR, CCPA, LGPD or GDPR & CCPA.
- Save the changes and the cookie notice will appear on your website.
How to Scan the Website for Cookies? #
To scan the cookies on your website, your website must fulfill the following conditions-
- You must have the WP Cookie Consent Pro Plugin activated on your website.
- Your website should be a live site ( Cookie Scanning doesn’t work for websites on local servers or under construction ).
- The following ports should be open on your server – 25,53,465,587,80 and 443.
For scanning the cookies on your website, go to WordPress Dashboard > WP Cookie Consent > Cookie Settings > Cookie List Tab > Discovered Cookies card. Click on the ‘Scan Now’ button to start scanning.
Will I Have to Add all the Cookies Manually? #
No. The WP Cookie Consent plugin has a one-click scanner, that’ll scan your website for all the cookies. It’ll also pre-populate cookie information for known cookies.
Can I Change the Information on the Scanned Cookies? #
Yes. You can edit the information on your website’s cookies. You can edit the cookie category and purpose.
Do Visitors Now Have to Accept/Reject Cookies in Order to Use Websites? #
No. Only the ‘necessary’ cookies will be loaded until the user gives consent.
Will my Website Become GDPR Compliant After Installing the Plugin? #
Cookie consent is just one aspect of GDPR. Installing the plugin does not guarantee compliance. You’ll still need to implement other aspects of the GDPR regulation.
How can I Manually Add Cookie Policy Data? #
- Go to Admin Menu > WP Cookie Consent > Policy Data.
- Click on “Add New“, fill in the data and publish.
If you are using the “PRO” version, the plugin will do this automatically for you.
How Can I Display Cookie Policy Data on Page? #
Use the shortcode [wpl_cookie_details] to display cookie policy data on the pages.
How to Translate the WP Cookie Consent Plugin Using WPML? #
- Make sure that the plugin is installed and activated.
- Install WPML and ensure that it is configured correctly. The configuration and setup guides for WPML can be found on their website here: WPML Getting Started Guide
- Go to the WPML >String Translation page and click the Can’t find the strings you’re looking to translate?
- A dialog will slide open. Select the WP Cookie Consent plugin and click the Scan translation files button.
- After the scan is complete, the page refreshes and you can now select the “gdpr-cookie-consent” in the Select string within domain dropdown.
- To manually translate, click the translations link for the text in question, enter the translation, select the Translation is complete checkbox and click Save.
- You can also send strings for translation by your designated local translators or professional translation service. For this, you need to have the WPML Translation Management module installed on your site.
- Select the strings to translate, the languages to translate them into and click on the button to Add to translation basket. From the Translation Basket tab of the WPML > Translation Management page, you will then be able to select the translator and send the selected texts for translation. Your local translators will be able to access the String Translation screen and translate just the ones that you’ve sent them for translation.
How to Customize the Cookie Banner Design? #
The WP Cookie Consent provides several ways to customize your cookie banner design. Go to WordPress Dashboard > WP Cookie Consent > Cookie Settings > Design Tab to see the settings for various components you can customize like Cookie Notice Body, Accept Button, Decline Button, etc.
The WP Cookie Consent Pro also provides some pre-designed templates to style your cookie banner. To select a template, go to WordPress Dashboard > WP Cookie Consent > Cookie Settings > Configuration Tab.
How to Customize Bookie Banner Content? #
The WP Cookie Consent plugin provides several ways to customize the content of your cookie banner.
- Go to WordPress Dashboard > WP Cookie Consent > Compliances Tab.
- The Cookie Notice card provides options to customize the message displayed on the cookie banner.
- The Privacy Policy card provides several settings to add a link to your Privacy Policy inside your cookie banner.
- The Revoke Consent card provides several settings to provide a user with the option to revoke their consent/ update their opt-in choices at any time.
How to Block Third-Party Cookie Scripts? #
To block third-party cookie scripts, you must have the WP Cookie Consent Pro plugin activated on your website.
- Go to WordPress Dashboard > WP Cookie Consent > Script Blocker Tab.
- Turn on the Script Blocker.
- Click on the ‘Advanced Settings’ button, a popup will appear. The popup has a list of third-parties script blocking is supported for. Select the desired third party and its category.
How to Display the Cookie Details Table in your Cookie / Privacy Policy? #
- If you are starting with a new website, we recommend WP Legal Pages – WP Cookie Policy Generator Plugin.
- WP Legal Pages automatically generates the 3rd Party Cookie Table.
- If you have an existing Cookie Privacy Policy page. To embed a third-party cookie details table: Use the shortcode [wpl_cookie_details] displays Cookie policy data on the pages and/or posts.
- Open the Cookie Policy Page on the WordPress editor and paste the shortcode under the 3rd Party Cookies.
- Instead of shortcode, you can also use Gutenberg Block named as ‘WP Cookie Details’
- Please note that [wpl_cookie_details] does not display the scanned cookie details, instead it displays the Cookie Policy Data in your Legal Pages or any other pages where the shortcode is added.
How to Enable IAB Transparency and Consent Framework (TCF), and Why You Should Do It? #
The purpose of the IAB Framework is to create standardized cooperation between online publishers, advertisers, and tech companies supplying consent management when it comes to meeting GDPR requirements for transparency and user consent.


