This page shows how you can access the GDPR functionality in brief.
Go to WP Cookie Consent > Cookie Settings > Compliances.
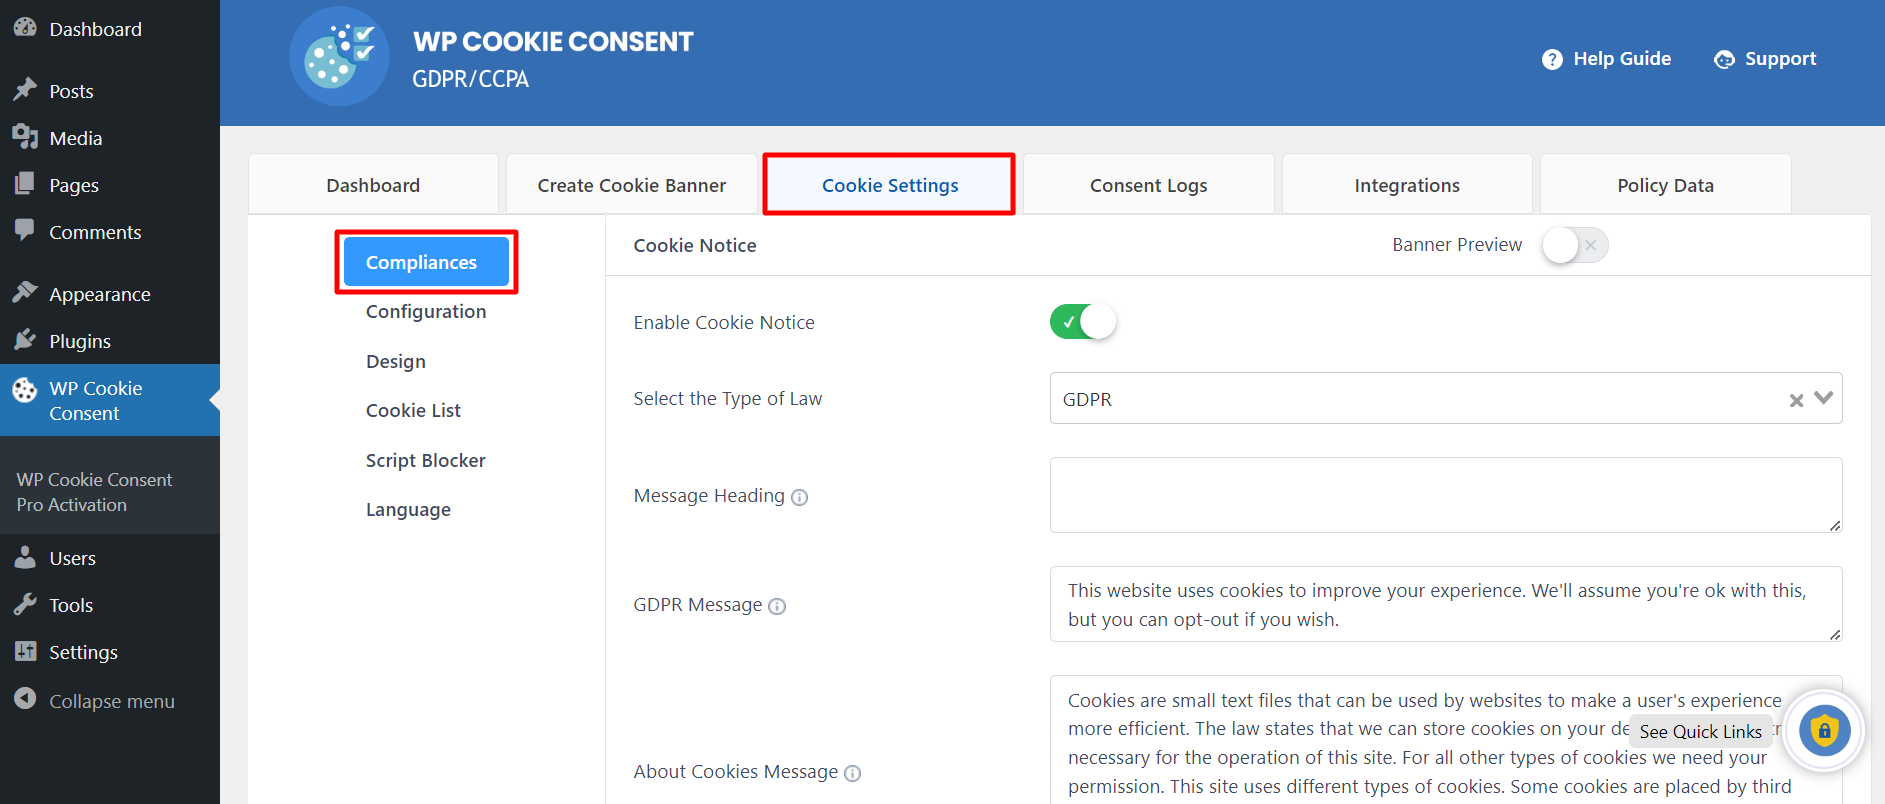
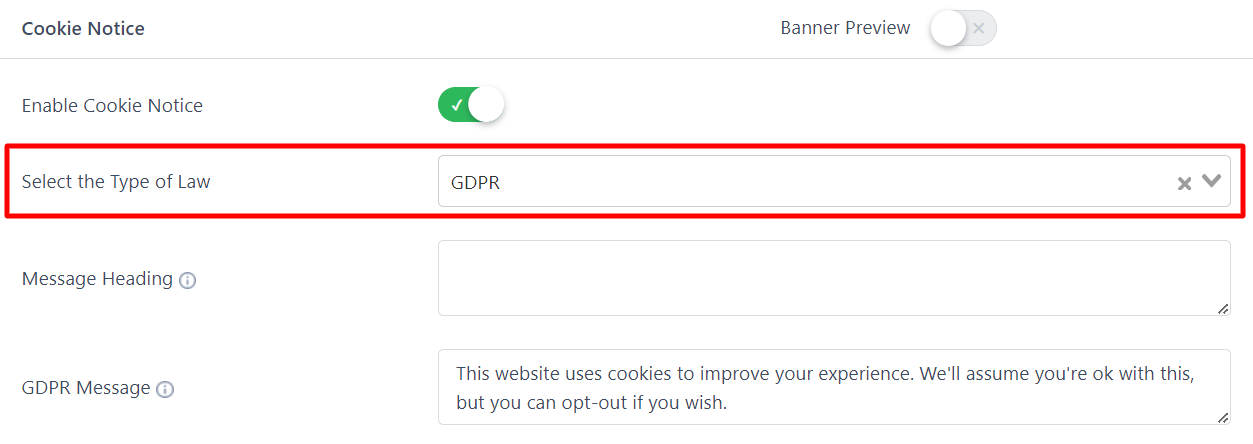
Under Cookie Notice card, click on Select the Type of Law option as GDPR.
For GDPR there are 6 tabs – Compliances, Configuration, Design, Cookie List, Script Blocker and Language.
Compliances #
Compliances tab has 6 cards – Cookie Notice, Enable Visitor Conditions, Privacy Policy Settings, Revoke Consent, Consent Settings, and Extra Settings.
Cookie Notice #
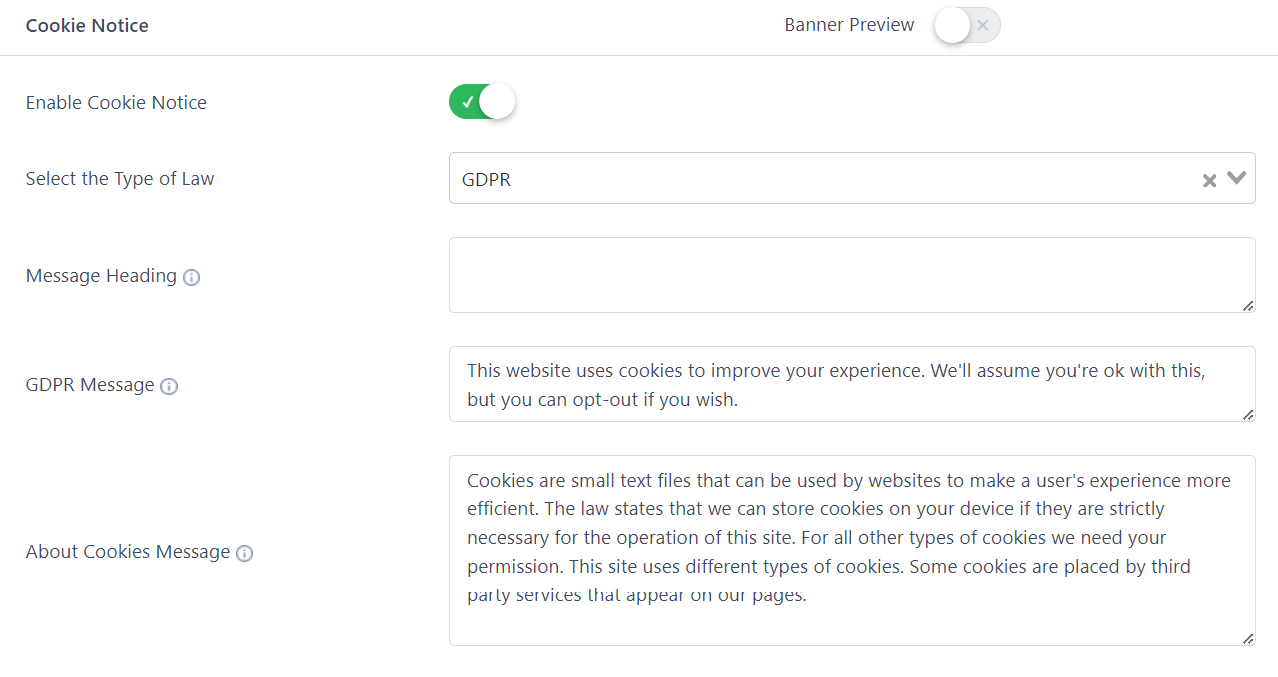
- Enable Cookie Notice – (Enable / Disable) the cookie bar on your website.
- Select the Type of Law – (GDPR / CCPA / GDPR & CCPA / ePrivacy) Select GDPR to show GDPR Cookie Consent Notice Bar.
- Message Heading – Enter the text you want to display as heading on Cookie Bar. If you want a smaller height, you can keep this empty.
- GDPR Message – This text will be displayed on Cookie Bar. Depending on the language of the site, you can change this text to other languages.
- About Cookies Message – This text will be visible to website visitors under ‘About Cookies’ section when they click on ‘Cookie Settings’ button.
Enable Visitor Conditions #

- Show only for EU Visitors – (GDPR) Show cookie notice to European visitors only.
Privacy Policy Settings #
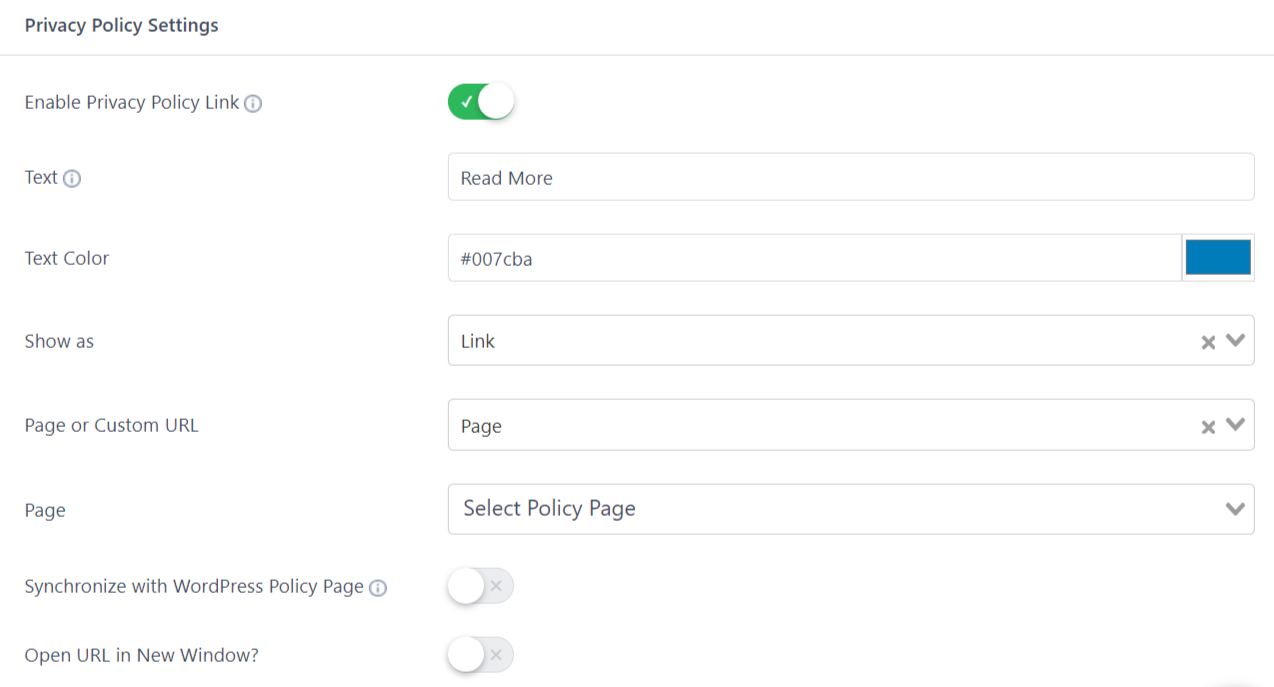
Using the Privacy policy settings, you can choose to add a link to your Privacy Policy page/URL to the cookie message.
- Enable Privacy Policy Link – (On / Off) Enable or disable the button.
- Text – Text which should be displayed on a particular button.
- Text Color – (Color picker) Select color for the button.
- Show as – (Button / Link) Select appearance as a button or as a link.
- If you select Button then the following settings will appear:
- Background Color
- Background Opacity
- Border Style
- Border Width
- Border Color
- Border Radius
- Button Size
- If you select Button then the following settings will appear:
- Page or Custom URL – (Page / Custom Link) Select a published page from the website or provide a custom link where visitors will be taken after clicking on Read More Link.
- Page – Select a published page from a website or provide a custom link where visitors will be taken after clicking on ‘Read More Link’.
- Synchronize with WordPress Policy Page – (Enable / Disable) If enabled, visitor will be redirected to Privacy Policy Page set in WordPress settings irrespective of Page set in the previous setting. You can update WordPress Privacy Policy Page by visiting WordPress Dashboard > Settings > Privacy > Change your Privacy Policy page.
- URL – If ‘Action’ is selected as Custom URL then provide which url will be opened.
- Open URL in new window? – (Yes / No) If ‘Action’ is selected as Custom URL then select if URL should be opened in new window or same window.
Revoke Consent #
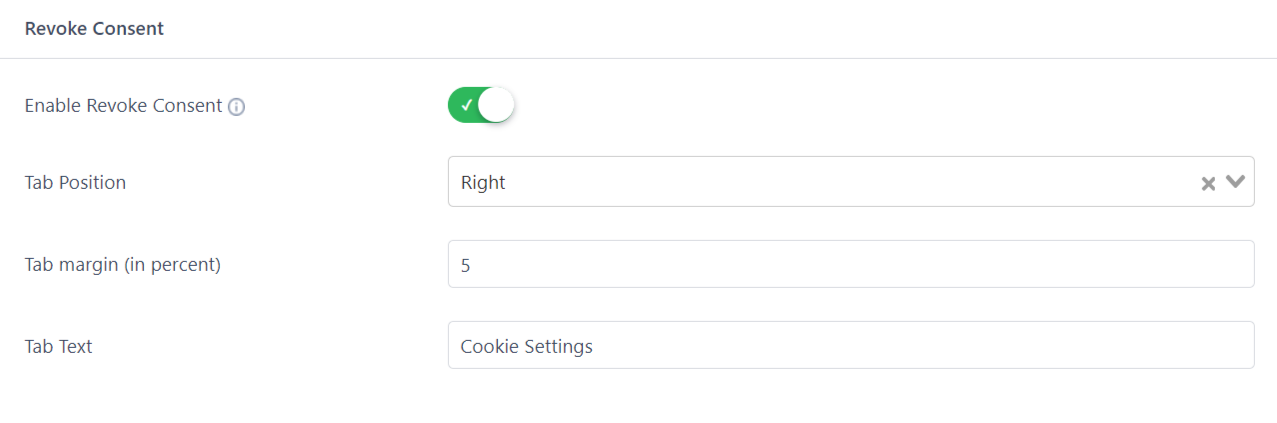
- Enable Revoke Consent – (Enable / Disable) If you want to show the option for the user to change consent. Appears after the visitor has accepted or rejected cookie options. It appears at the bottom of the webpage.
- Tab Position – (Left / Right) Select left or right side of the website.
- Tab Margin (in %) – Specify margin in percentage.
- Tab Text – The text to be displayed on the Show Again Button.
Consent Settings #
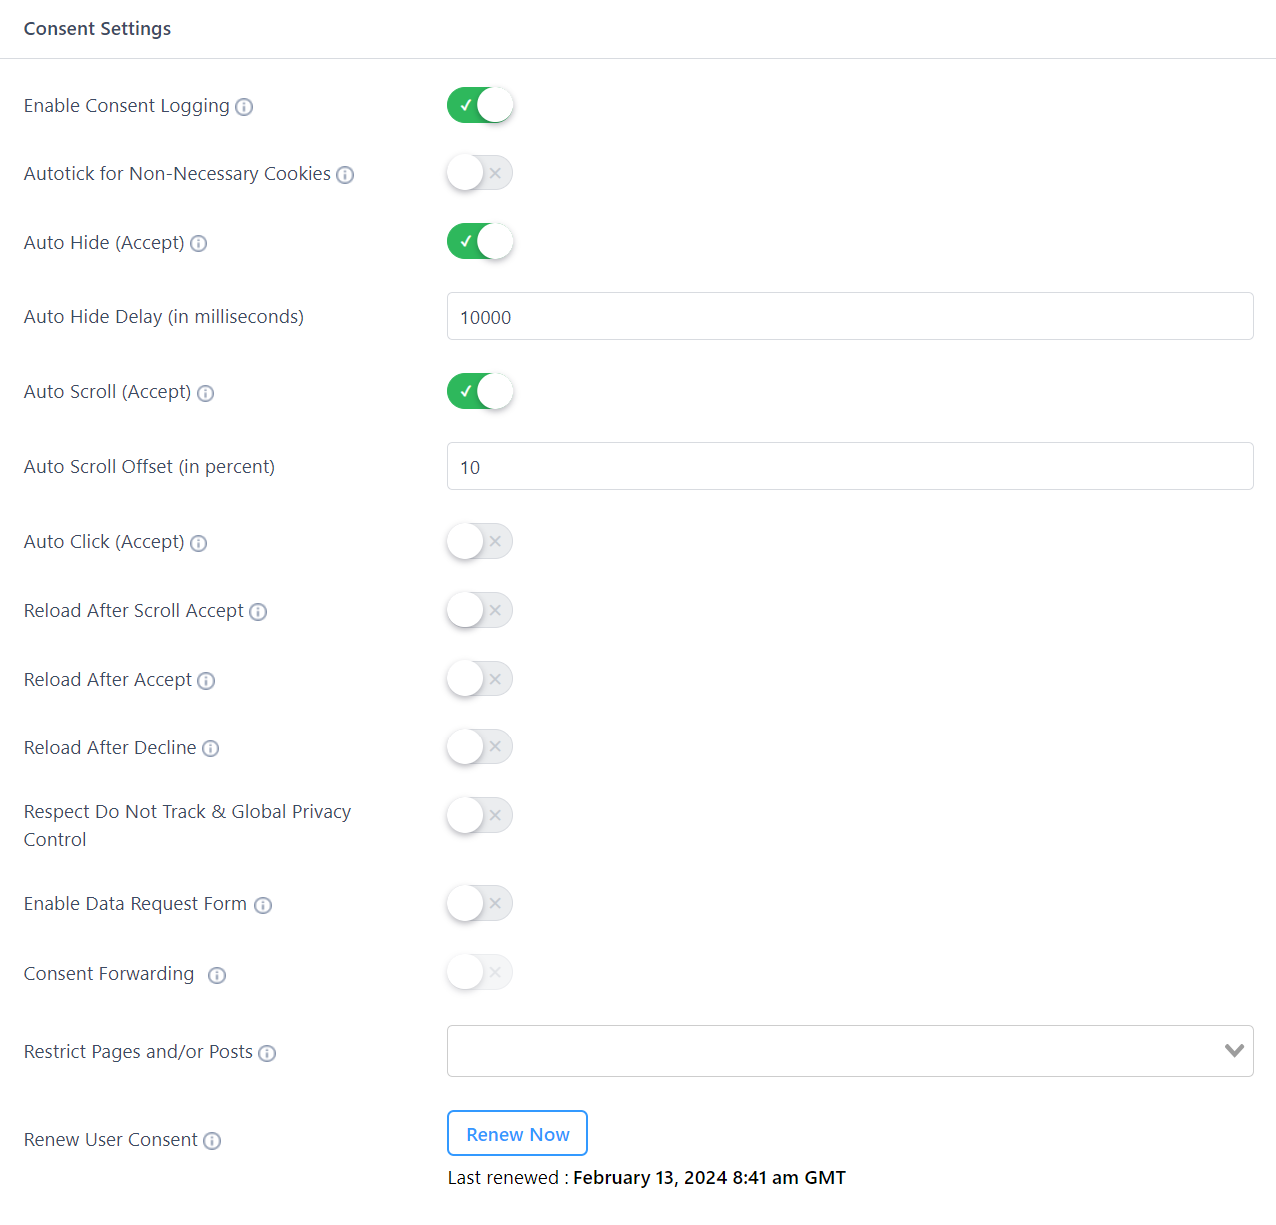
- Enable Consent Logging – Logs user consents.
- AutoTick for Non-Necessary Cookies- (Enable or Disable) Pre-select non-necessary cookie checkboxes.
- Auto Hide (Accept) – (Enable or Disable) If enabled Cookie Bar will be automatically hidden after specified time (As set for the Auto Hide Delay) and cookie preferences will be set as accepted.
- Auto Hide Delay (in Milliseconds) – Time after which Cookie Bar will be automatically hidden. Note that time is in milliseconds (1 second = 1000 milliseconds). Default: 10 seconds.
- Auto Scroll (Accept) – (Enable or Disable) If enabled, Cookie Bar will automatically hide after the visitor scrolls the webpage and consent will be automatically accepted as Yes (If Auto-Tick for Non-Necessary Cookies are enabled).
- Auto Scroll Offset (in percent) – Auto Scroll setting will affect after this much percentage of webpage is scrolled.
- Auto Click (Accept) – (Enable or Disable) If enabled, cookies will be accepted automatically when the visitor clicks anywhere on the page (except for the cookie bar area).
- Reload after Scroll Accept – (Enable or Disable) If enabled webpage will be refreshed automatically once cookie settings are accepted because of scrolling.
- Reload after Accept – (Enable or Disable) If enabled webpage will be refreshed automatically once cookie settings are accepted.
- Reload after Decline – (Enable or Disable) If enabled webpage will be refreshed automatically once cookie settings are declined.
- Respect Do Not Track & Global Privacy Control – By enabling this you’re indicating that a website does not collect or track online user data.
- Enable Data Request Form – Enable to add data request form to your Privacy Statement.
- Consent Forwarding – If you have multiple WordPress sites for one organization, you can get user consent on one site, and it will count for selected sites in the network.
- Restrict Pages and/or Posts – Select pages and/or posts to be excluded during scanning of your website for cookies.
- Renew Consent –If you change how your website collects data, renew consents to ensure compliance with data protection regulations. Prompt the cookie banner to reappear for all users who previously gave consent.
Extra Settings #

- Delete Plugin Data on Deactivation – Enable to delete all the plugin data from the database on deactivating the plugin.
- Show Credits – If you are happy with the product and want to share credit with the developer.
- Cookie Expiry – (Dropdown) Select the time for which cookie with user preferences will be saved on user’s browser.
- Enable Safe Mode for Cookies – When safe mode is enabled, all integrations will be disabled temporarily.
- Export Personal Data – This tool helps site owners comply with local laws and regulations by exporting known data to a user in a .zip file.
- Erase Personal Data – This tool helps site owners comply with local laws and regulations by deleting or anonymizing known data for a given user.
- Reset Settings – This will reset the settings to their default values.
Configuration #
Configuration tab has 3 cards – Configure Cookie Bar, Cookie Bar Template and Settings Export / Import.
Configure Cookie Bar #
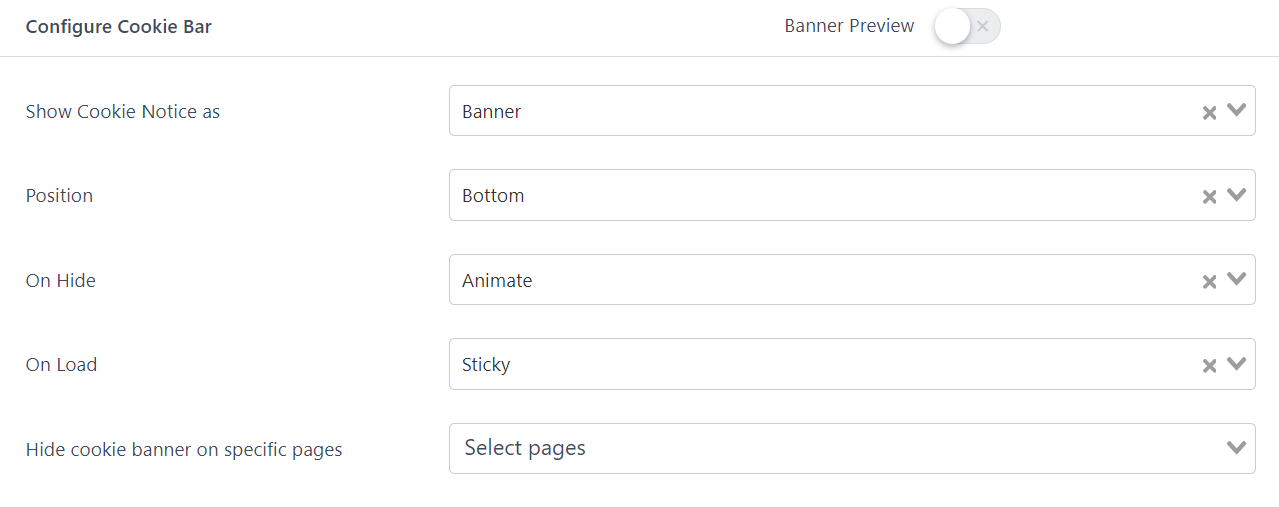
- Show Cookie Notice as – (Banner / Popup / Widget) Select how to display Cookie Bar.
- Cookie Bar Position – (Bottom / Top) If ‘Cookie Bar as’ option is selected as Banner, then select Bottom or Top position to display Cookie Bar Banner.
- Add Overlay – (On / Off) If ‘Cookie Bar as’ option is selected as Popup, Select if there should be Overlay or not for popup.
- Cookie Bar Position – (Left / Right) If ‘Cookie Bar as’ option is selected as Widget, Select left or right position to display Cookie Bar Widget.
- On hide – (Animate / Disappear) Select behavior of closing action of Cookie Bar once visitor accepts or rejects cookie settings.
- On load – (Animate / Sticky) Select behavior of loading action of Cookie Bar when the visitor visits a page.
- Hide cookie banner on specific pages – Select the page from which you want to hide the cookie banner.
Cookie Bar Template #
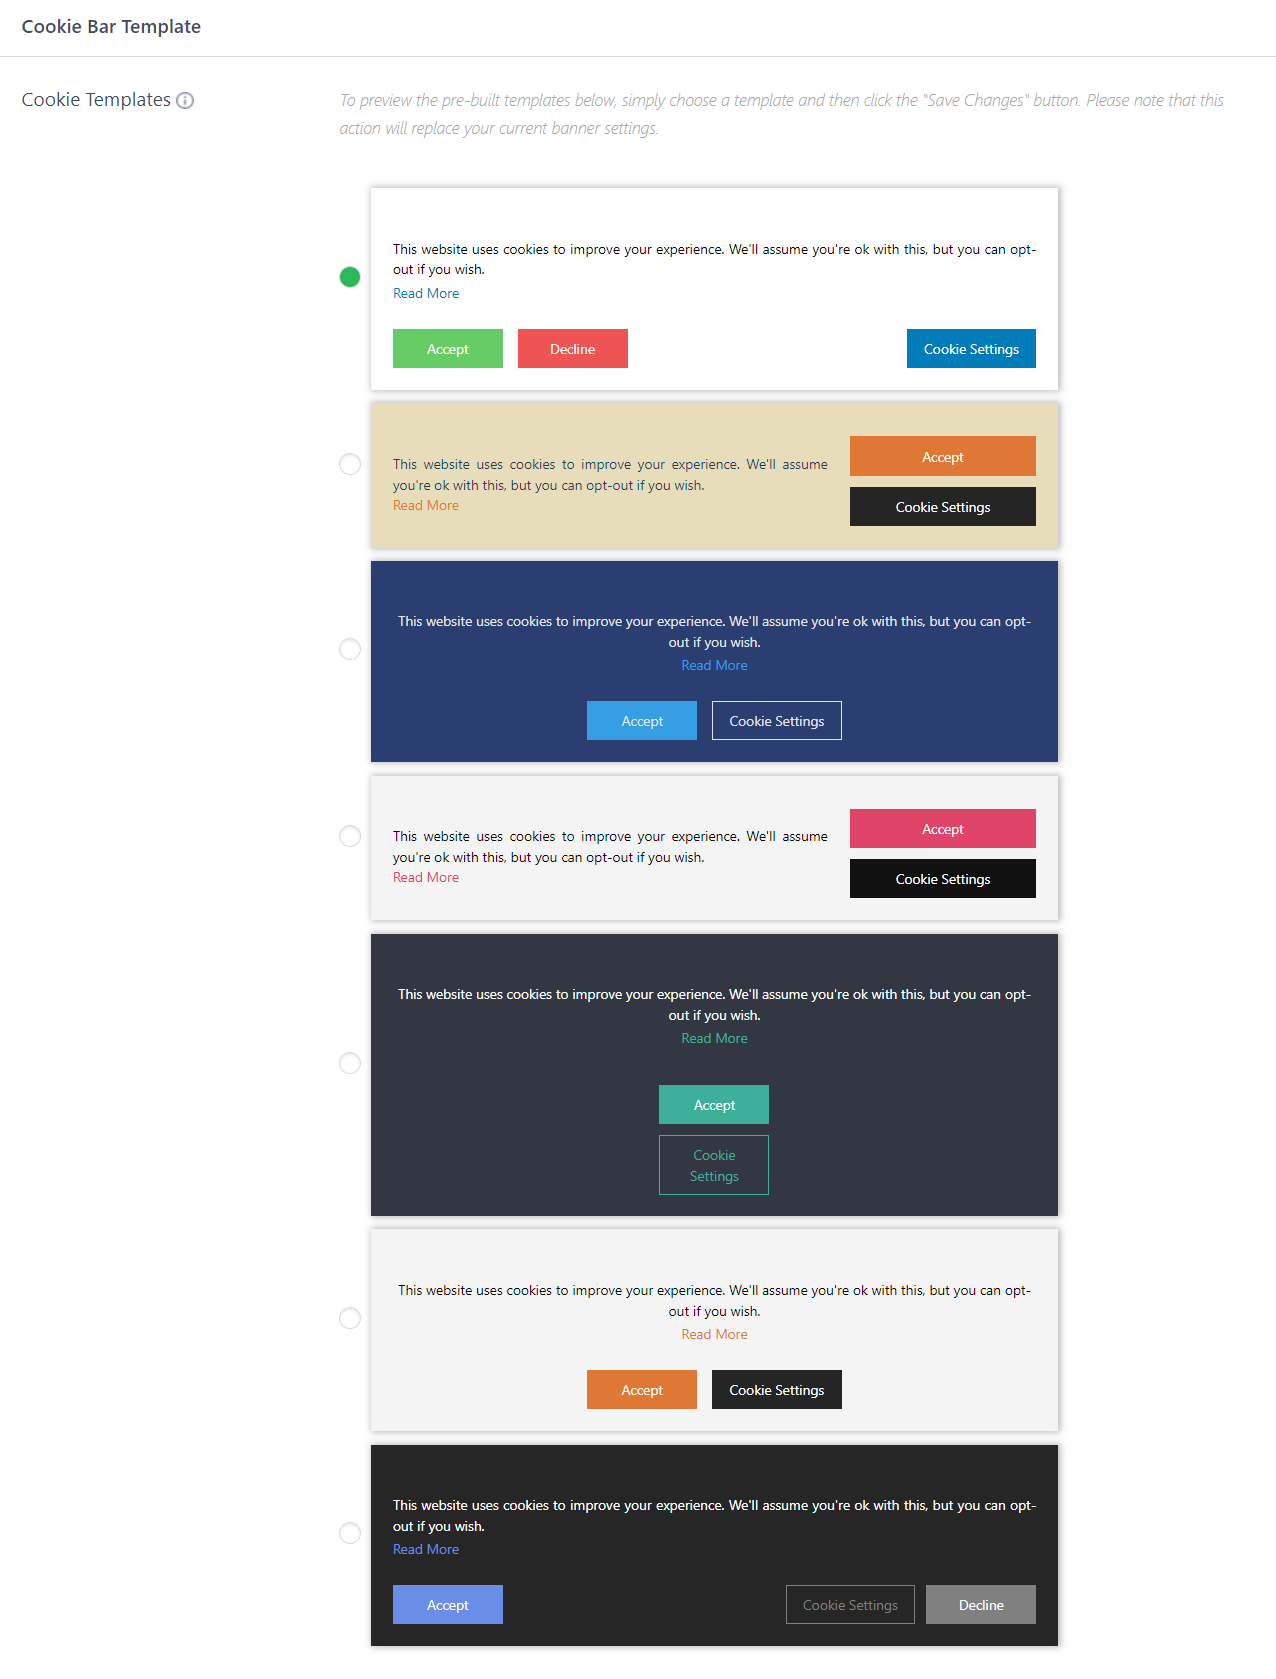
- Cookie Bar Template – Select template with predefined styles for Cookie bar. Select Cookie Bar as you wish. If you use any template preview will be displayed with default text.
Settings Export / Import #
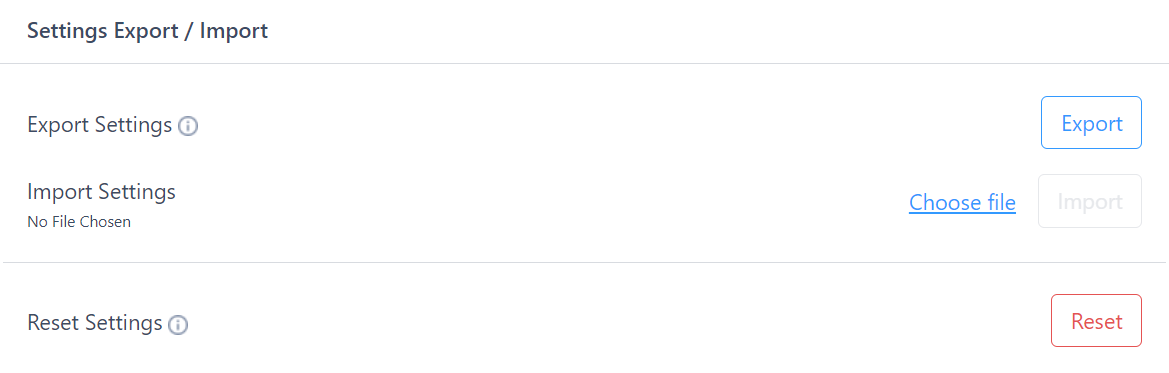
- Export Settings – You can use this to export your settings to another site.
- Import Settings – Choose a file to import.
- Reset Settings – This will reset all default settings and delete all WP Cookie Consent plugin data.
Design #
Design tab has 5 cards – Cookie Bar Body Design, Accept Button, Accept All Button, Decline Button, Settings Button and Add Your Custom CSS.
Cookie Bar Body Design #
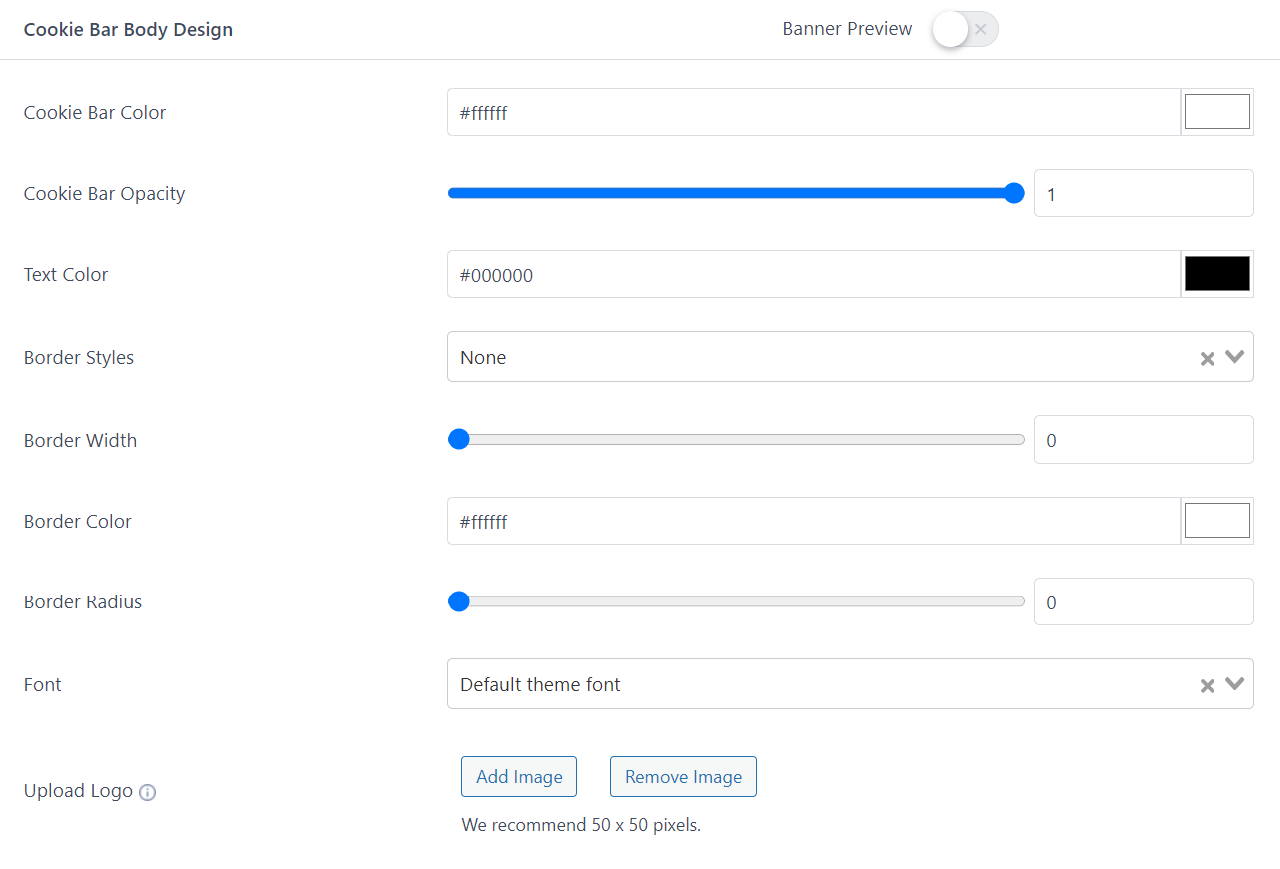
- Cookie Bar Color – (Color picker) Select color for Cookie Bar.
- Cookie Bar Opacity – (Slider) Select opacity for Cookie Bar, You can adjust the transparency of Cookie Bar here.
- Text Color – (Color picker) Select color for text on Cookie Bar.
- Border Styles – (Dropdown selector) Select a style for the border of the cookie bar.
- Border Width – (Slider) Select the width for the cookie bar border.
- Border Color – (Color picker) Select color for Cookie Bar border.
- Border Radius – (Slider) Select the radius for the cookie bar border.
- Font – (Dropdown selector) Select your default theme font or from provided standard fonts for Cookie Bar text.
- Upload Logo – Add or remove the Cookie Bar logo.
Accept Button #

- Enable – (On / Off) Enable or disable the button.
Clicking on Configure button will open a popup with Button settings.
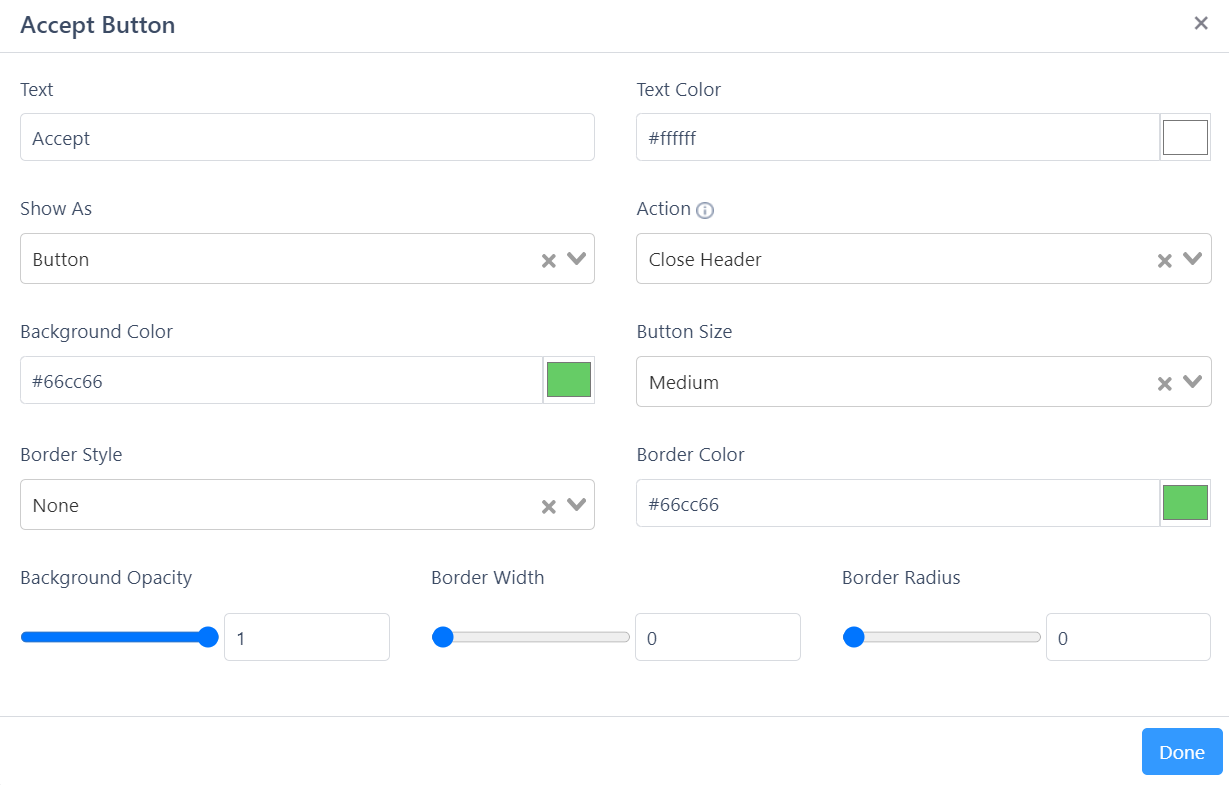
- Text – Text which should be displayed on particular button.
- Text Color – (Color picker) Select color for button.
- Show as – (Button / Link) Select appearance should be as button or as link.
- Action – (Close Header / Open URL) Select the action to take when the user clicks on the button. If the Close Header option is selected, the Cookie Bar will close. If the Open URL option is selected, the provided URL will open.
- URL – If ‘Action’ is selected as Open URL, provide which URL will be opened.
- Open URL in new window? – (Yes / No) If ‘Action’ is selected as Open URL then select if URL should be opened in new window or same window.
- Background Color – (Color picker) Select background color for button.
- Button Size – (Large / Medium / Small) Select size from predefined options for each button. Default value is Medium. For Read More link this option is not available.
- Border Style – Select the type of border style from the given options for the button.
- Border Color – Select the border color for the button.
- Background Opacity – Select background opacity for button.
- Border Width – Select the border width for the button.
- Border Radius – Select the border radius for the button.
The cards Accept Button, Accept All Button, Decline Button, Settings Button have the same set of settings for the respective buttons.
Cookie List #
Cookie List tab has 2 cards – Custom Cookies and Discovered Cookies.
Custom Cookies #
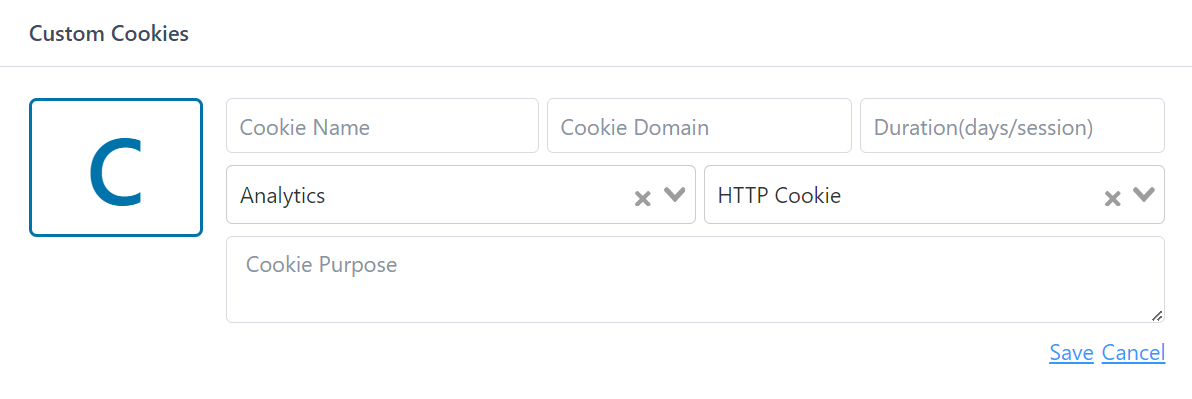
In the Custom Cookies section, you can manually add the cookies and their details. The following are the fields in the Cookie List tab:
- Cookie Name – Add the name of the cookie.
- Cookie Domain – Domain that sets this cookie.
- Cookie Duration – Time duration the cookies will be active on the browser.
- Cookie Category – Category where you want the cookie to belong. The category includes Analytics, Marketing, Necessary, Preferences and Unclassified.
- Cookie Type – The types include HTTP Cookie, HTML Local Storage, Flash Local Shared Object, Pixel Tracker and IndexedDB.
- Cookie Purpose – Description specifying the purpose for which cookie will be used.
After the above changes, save the settings.
Discovered Cookies #
Discovered Cookies section lets you automatically scan the cookies and add them to the plugin.

Clicking on the Scan Now button, the plugin will start scanning important URLs of the website. (available in Pro version).
You could also exclude pages and/or posts from scanning. The setting is available under Compliances Tab > Consent Settings > Restrict Pages and/or Posts.

Script Blocker #
Script Blocker tab has 2 cards – Script Blocker Settings and Whitelist Scripts.
Script Blocker Settings #
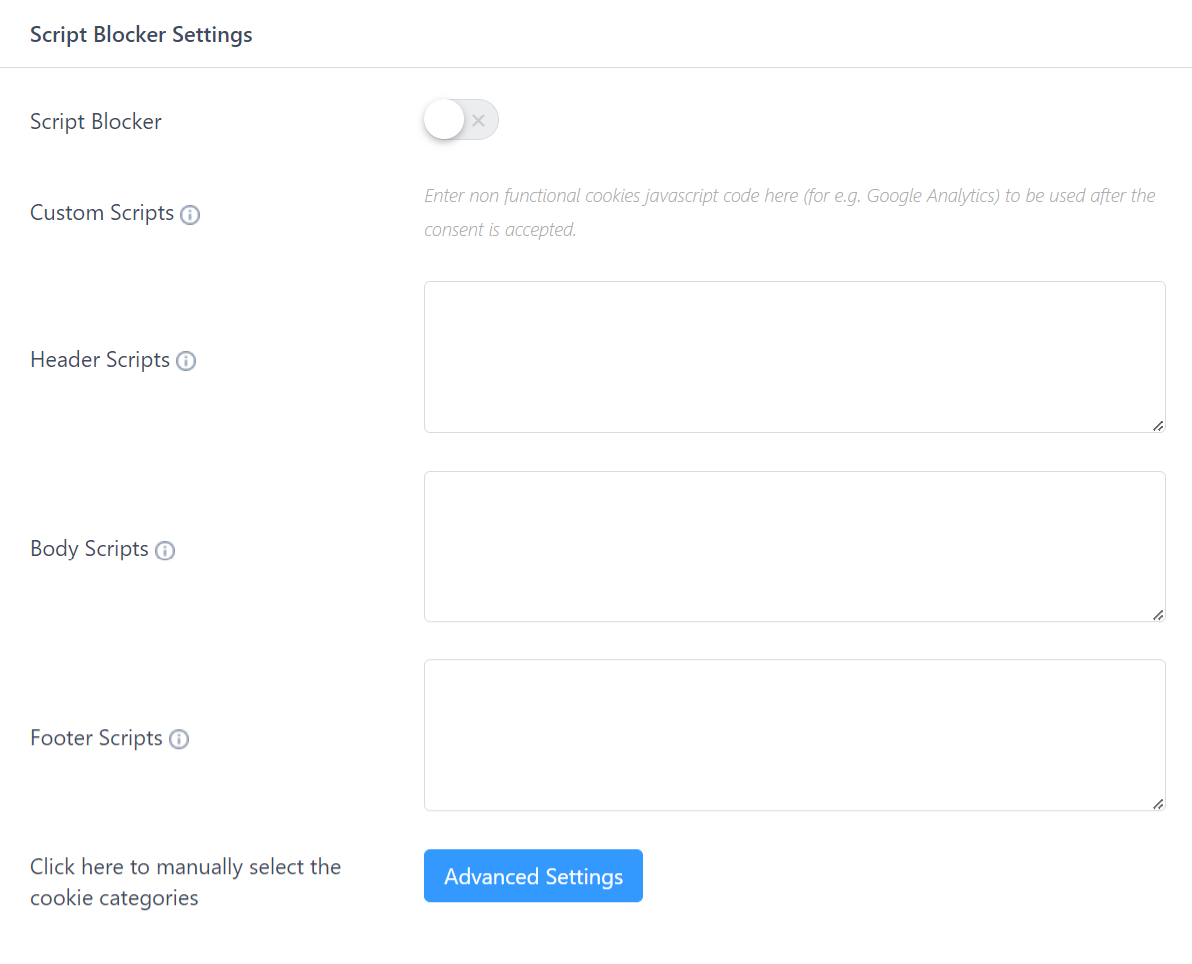
- Script Blocker – Enable or Disable the Script Blocker using the toggle button.
- Custom Scripts – Enter non-functional cookies javascript code here to be used after the consent is accepted.
- Header Scripts – Add scripts in the header location. Upon acceptance, these scripts will run in the visitor’s browser.
- Body Scripts – Add scripts in the body location. Upon acceptance, these scripts will run in the visitor’s browser.
- Footer Scripts – Add scripts in the footer location. Upon acceptance, these scripts will run in the visitor’s browser.
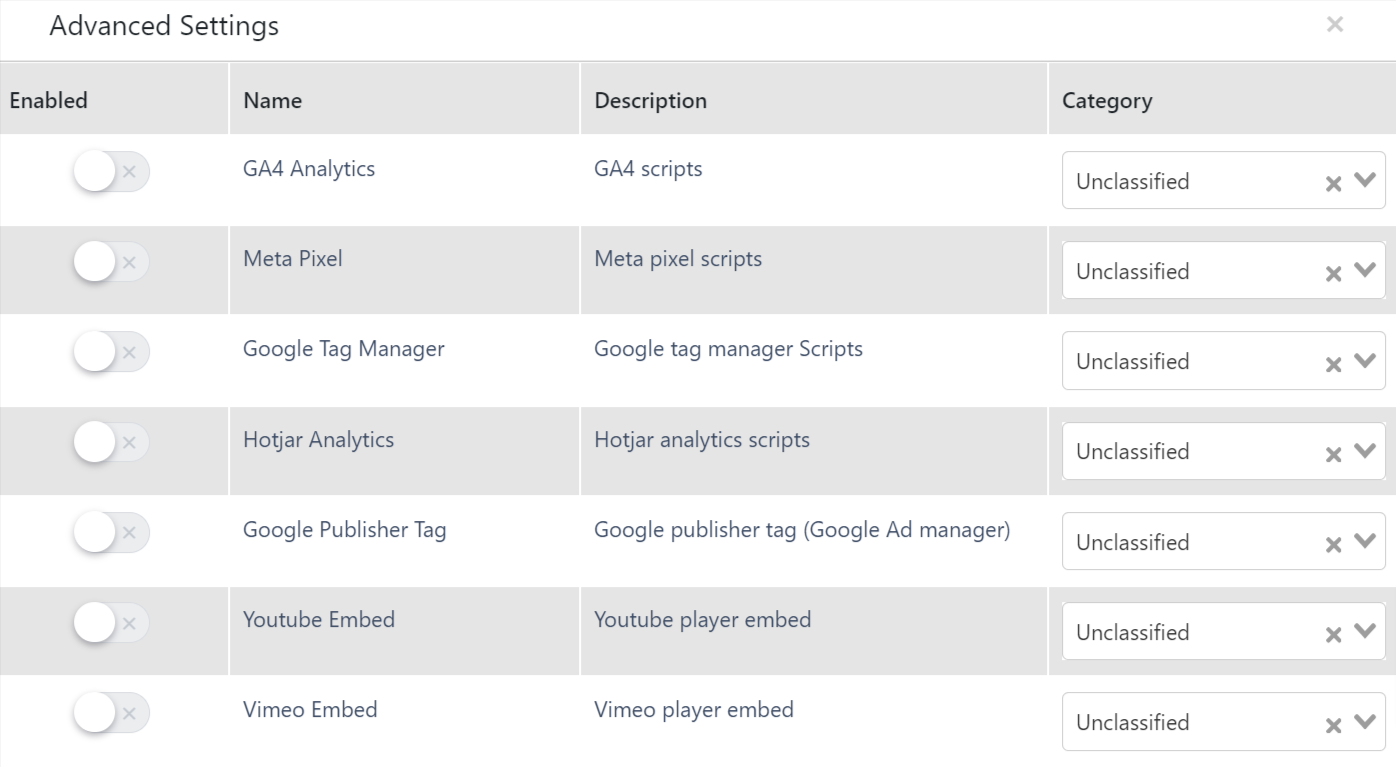
- Click here to manually select the cookie categories – By clicking the Advanced Settings option, you can select manually from the list of 21 cookie categories.
Whitelist Scripts #

Whitelist Script allows essential scripts to run without user consent, ensuring compliance with regulations and maintaining website functionality. It lets website owners specify critical scripts exempt from consent requirements, improving user experience and legal compliance.
Here, you can add multiple scripts as well by clicking on the plus icon
Language #
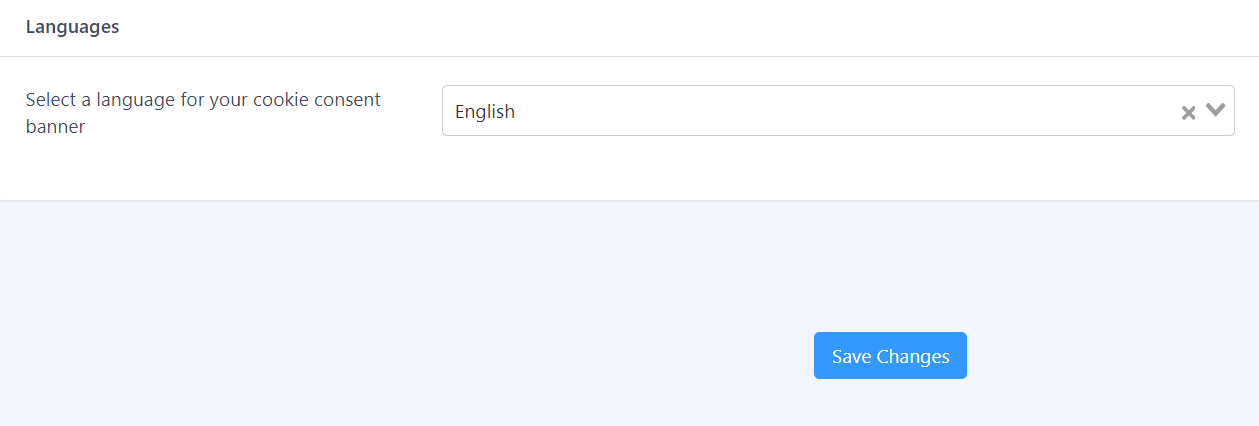
- Select a language out of 12 languages for your cookie consent banner
Watch this video to better understand how to configure the settings of GDPR Cookie Consent:


